
Before You Replace the Drier: Diagnose the System and Plan the Complete A/C Service
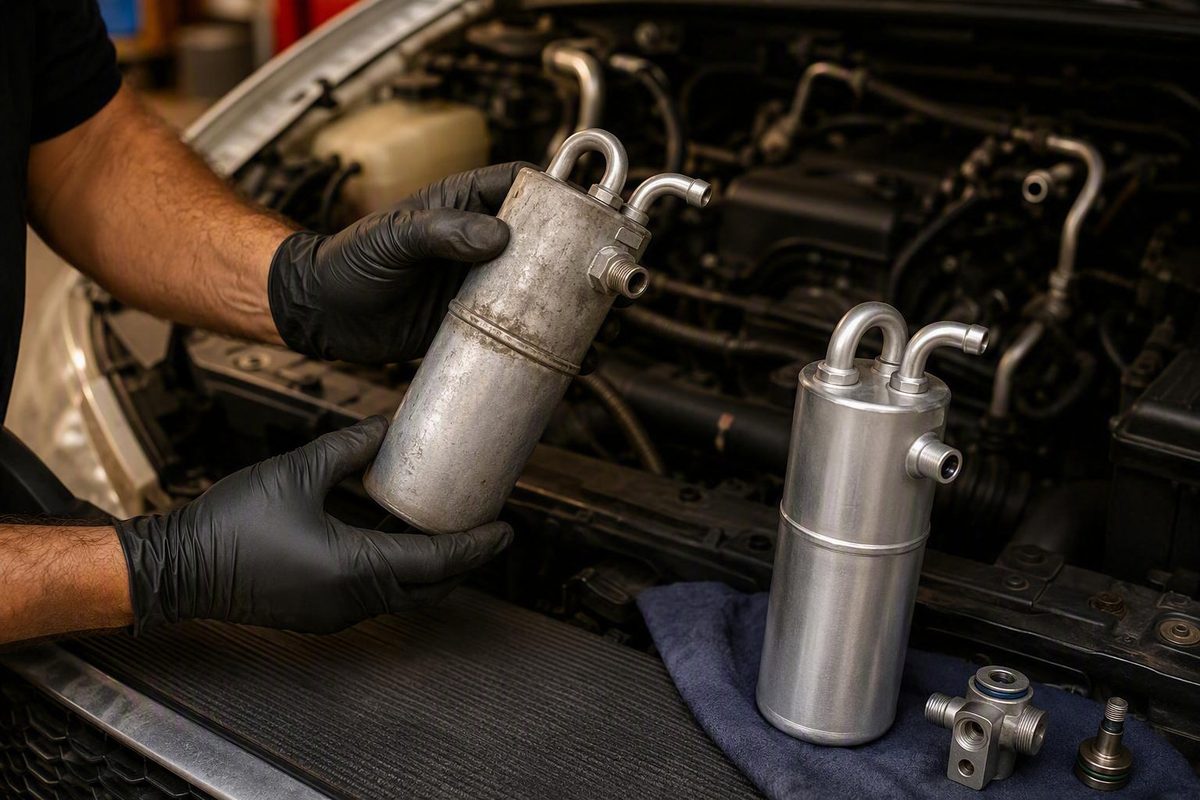
Depending on the vehicle, the manufacturer may require a complete condenser replacement or provide a separate desiccant service procedure.
An A/C receiver-drier replacement is contamination-control work, not simply a matter of removing one canister and installing another. Because the drier is part of the sealed refrigerant circuit, the repair must account for moisture exposure, debris, seals, lubricant, refrigerant recovery, evacuation, leak checking, and a measured recharge.
Replacement may be warranted after prolonged atmospheric exposure, receiver-drier leakage or restriction, desiccant breakdown, internal contamination, compressor debris, or related condenser repairs. Weak cooling alone is not enough evidence.
Before ordering parts or opening the circuit, confirm the vehicle’s system design, diagnose why service is needed, obtain the exact refrigerant and lubricant specifications, and arrange the complete sealed-system service.
When does an A/C receiver-drier need to be replaced?
Short answer: Replace the receiver-drier when known exposure, leakage, restriction, contamination, desiccant failure, compressor damage, related condenser work, or the vehicle manufacturer’s procedure supports replacement. Do not replace it automatically merely because the vents are blowing warm air.
The most useful decision path starts with the event that led to the repair.
The system was opened only briefly
A short disconnection that was capped immediately is different from a circuit left open for days. Component suppliers commonly recommend replacing the drier whenever the refrigerant circuit is opened. For example, Valeo recommends replacement after the circuit is opened and says the new unit’s protective plugs should be removed as late as possible.
That is supplier guidance, not proof of a universal requirement for every vehicle and every brief opening. Check the factory procedure for the exact model and consider:
- Why the connection was opened
- How long it remained open
- Whether the openings were capped promptly
- Whether the vehicle or component warranty requires replacement
- Whether contamination or moisture exposure is suspected
If the manufacturer requires replacement after any opening, follow that instruction. If its procedure distinguishes between a brief controlled disconnection and extended exposure, use those criteria instead of a blanket rule.
The circuit was open for an extended period
Ambient air can enter, and the desiccant can absorb moisture from it.
The supplied evidence does not establish a universal safe exposure period. A forum rule expressed as a fixed number of hours cannot replace the vehicle manufacturer’s instructions.
If the system has been sitting open, cap the remaining openings while obtaining the correct procedure. Do not install a new drier early in a long repair and then leave it exposed while unrelated work continues.
The system lost refrigerant or has a leak
Loss of refrigerant does not automatically establish that the receiver-drier failed. Find the leak first and determine, as far as possible, how long the system may have been empty or exposed.
Replacement becomes more defensible when:
- The drier itself is leaking.
- Its shell or fittings are damaged or corroded.
- The circuit has been empty and exposed for an unknown period.
- Moisture or internal contamination is confirmed.
- The vehicle’s leak-repair procedure calls for a new drier.
- Repair requires replacing a condenser containing an integrated drier.
The underlying leak must still be repaired. A new receiver-drier cannot compensate for an uncorrected leak elsewhere in the circuit.
The compressor failed
A mechanically damaged compressor can distribute metal or other debris through the system. The receiver-drier’s internal filter may capture some of that material and become restricted, but changing the drier alone does not remove contamination elsewhere.
Treat an internal compressor failure as a broader contamination event. Identify the failure mode, inspect the system as directed by the manufacturer, and follow the applicable cleaning or component-replacement procedure. Check the replacement compressor’s warranty terms before deciding which related components to retain.
The condenser was damaged or replaced
Collision damage, corrosion, leakage, or internal restriction may require condenser replacement. If the desiccant chamber is integrated into the condenser, the repair may automatically include a new drier element or a complete condenser assembly.
A standalone receiver-drier may also require replacement during condenser work, depending on atmospheric exposure and the manufacturer’s procedure. Do not assume that a cartridge displayed in an online catalog is accessible or factory-serviceable on the vehicle.
Restriction or desiccant failure is suspected
Replacement is supported when testing identifies an internal restriction or when desiccant material has escaped into the circuit. Both conditions require examination of the wider system: replacing the container without addressing circulated contamination may leave the original problem in place.
Some suppliers also promote calendar-based replacement. One commercial source recommends replacement every two or three years depending on use and environment, but it does not provide an OEM schedule for a particular vehicle (AMA’s receiver-drier guidance).
Unless the exact vehicle manufacturer specifies an interval, do not turn receiver-drier replacement into routine calendar maintenance.
What the receiver-drier does—and which design your vehicle has
A receiver-drier performs several functions in an expansion-valve automotive A/C system:
- Moisture control: Desiccant absorbs moisture present in the refrigerant circuit.
- Filtration: Internal filter material traps at least some circulating debris.
- Temporary storage: Under some operating conditions, the unit may temporarily hold refrigerant and lubricant.
A typical receiver-drier is on the high-pressure side between the condenser outlet and the expansion-valve inlet. Commercial A/C guidance describes that location along with the component’s drying, filtration, and temporary-storage roles (Classic Auto Air’s receiver-drier overview).
That description does not mean every vehicle has an accessible standalone canister. The following configurations exist.
1. Standalone receiver-drier
This is a separate canister connected between the condenser and expansion valve. It may be secured by a clamp or bracket and use threaded fittings, a manifold, or other model-specific connections.
Access can be simple or may require removal of surrounding components. The part’s appearance alone does not establish the correct removal procedure.
2. Receiver-drier integrated into the condenser
Some condensers incorporate a side or vertical chamber containing the desiccant. That chamber may appear to be part of the condenser rather than a separate service component.
Depending on the application, the manufacturer may prescribe complete condenser replacement or may provide a separate desiccant service procedure. A visible chamber does not prove that a cartridge is removable, accessible with the condenser installed, or supported as a factory repair.
3. Replaceable desiccant cartridge
Certain integrated designs use a bag or cartridge behind a cap. A replacement kit may contain the desiccant element, seals, and cap or retaining pieces.
The service path still varies. The cartridge may be accessible in the vehicle, may require condenser removal, or may be offered only through the aftermarket even though the manufacturer services the condenser as an assembly.
Do not confuse a receiver-drier with an accumulator
Retail categories sometimes mix the two product types. One catalog, for example, uses an “AC Accumulator” category heading while displaying both accumulators and receiver-driers and requiring vehicle selection for fitment (AutoZone’s mixed catalog category).
Catalog wording does not establish system architecture. Receiver-driers are associated with expansion-valve systems, but another A/C design may specify a different component. Verify the exact vehicle rather than treating “receiver-drier,” “filter-drier,” and “accumulator” as interchangeable shopping terms.
Why VIN-specific verification matters
A forum discussion about a 2017 Subaru Outback illustrates the uncertainty surrounding integrated designs. Participants associated the desiccant with a condenser-side chamber but disagreed about whether the element could be replaced separately, whether condenser removal was necessary, and whether the complete condenser should be replaced (the conflicting Subaru Outback discussion).
That discussion is not a confirmed Subaru repair procedure. Its value is as a warning: catalogs, aftermarket kits, and owner discussions may produce conflicting answers even for the same model. Factory service information, production details, and VIN-specific parts data must determine the repair path.
Diagnose before buying the part
Weak cooling, icing, noise, or unusual pressure behavior can justify testing. None independently proves that the receiver-drier has failed.
Possible clues include:
- Weak or inconsistent cabin cooling
- Ice on or near the drier
- An unusual temperature change between its inlet and outlet
- Pressures outside the vehicle’s expected test range
- Noise from the drier area or connected fittings
- Visible desiccant elsewhere in the circuit
- Confirmed moisture contamination
- A leaking or physically damaged drier
- Debris associated with compressor damage
General replacement guidance identifies moisture, circulated desiccant, ice accumulation, and an inlet-to-outlet temperature drop as possible indicators, but these remain diagnostic clues rather than conclusive tests (YourMechanic’s receiver-drier overview).
The governing principle is diagnostics before parts, always: identify the fault before treating a symptom as proof that one component has failed.
Restriction can resemble other A/C faults
A restricted drier may reduce refrigerant flow, but similar complaints can result from:
- An incorrect refrigerant charge
- Air or excess moisture in the circuit
- An expansion-valve problem
- Insufficient condenser airflow
- Condenser damage or restriction
- Compressor control or mechanical problems
- Sensor, fan, clutch, or electrical faults
- Evaporator icing caused by another condition
The evidence does not support a universal pressure or temperature threshold for diagnosing every receiver-drier.
Use the exact vehicle’s test procedure and expected values. Evaluate relevant pressures, line temperatures, vent performance, compressor operation, and condenser airflow under the conditions specified by the manufacturer.
Stronger evidence versus nonspecific symptoms
Evidence that more directly supports replacement includes:
- Leakage from the drier or its non-serviceable body
- Known prolonged atmospheric exposure
- A confirmed internal restriction
- Escaped desiccant material
- Compressor debris in the circuit
- Physical damage affecting an integrated condenser and drier
- A manufacturer procedure requiring replacement for the repair
Odor, water under the vehicle, noise, icing, or weak cooling alone is nonspecific. Noise may come from another component or travel through connected lines.
Diagnose the system before buying the part.
Verify the replacement part and service specifications
Do not order the drier until its configuration and the required service data are confirmed. A product photograph resembling the original part is not enough.
Pre-purchase fitment checklist
Record and verify:
- Model year
- Make and model
- Engine and powertrain configuration
- VIN
- Refrigerant type
- Original equipment part number, if available
- Superseded part numbers
- Standalone, integrated, or cartridge design
- Port sizes and connection types
- Inlet and outlet orientation
- Mounting points and bracket arrangement
- Electrical fittings, switches, or sensors, if present
- Seal or O-ring requirements
- Whether a replacement condenser includes the desiccant element
Use VIN-specific parts information and factory service data. A generic catalog result with no vehicle selected cannot establish compatibility.
Service values to obtain before disassembly
The repair plan should identify:
- Refrigerant type
- Refrigerant charge weight
- Specified refrigerant lubricant
- Component oil allowance or the approved oil-accounting method
- O-ring material, dimensions, and part numbers
- Fitting and mounting-fastener torque values
- Required electrical shutdown procedure
- Evacuation criteria
- Approved leak-check procedure
- Post-repair pressure, temperature, and vent-performance targets
Do not guess these values from a generic article.
New compatible O-rings are generally appropriate when sealed fittings are disconnected. Lubricate them only with the oil specified for the vehicle and refrigerant system. Similar appearance does not establish that two O-rings or lubricants are interchangeable.
Be careful with oil accounting
Some generic procedures direct the technician to measure oil removed with the old drier and restore an equivalent amount. A vehicle manufacturer may instead specify a component allowance or another balancing method.
The correct approach can also depend on leakage, prior repairs, and the nature of a compressor failure. Do not use forum oil-distribution percentages or generic oil additions as universal specifications.
Check compressor and parts warranties
Some compressor suppliers or warranties require receiver-drier replacement when a compressor is installed. AP Air, for example, says many compressor warranties stipulate drier replacement, but the controlling terms are those supplied with the actual replacement compressor (AP Air’s receiver-drier guidance).
If warranty compliance matters, retain invoices and document the specified oil, replaced components, contamination-control work, evacuation, leak check, and refrigerant charge.
Set the DIY boundary before opening the A/C system
Do not open a charged refrigerant circuit before the refrigerant has been recovered using appropriate equipment. The supplied procedural guidance directs readers to professional refrigerant recovery before drier removal and professional recharge after installation (YourMechanic’s general service guidance).
The supplied evidence does not establish one universal legal standard, so check the requirements that apply where the vehicle will be serviced.
Basic preparation includes gloves, safety glasses, and the exact vehicle’s repair information. Commercial service guidance identifies those protective items while also recommending professional refrigerant removal (R & Y A/C Compressors’ service guidance).
A practical split-work model
For a suitable vehicle and an experienced repairer, the work may be divided between an A/C shop and the owner:
- Diagnose and plan the complete repair.
- Arrange professional refrigerant recovery.
- Confirm that the circuit is ready to open.
- Perform only mechanical work supported by the vehicle procedure and your ability.
- Cap or plug every disconnected opening immediately.
- Keep the new drier sealed until its connections are ready.
- Return promptly for evacuation, the specified leak check, and weight-based recharge.
- Verify operation against vehicle specifications.
Coordinate the schedule before recovery. Leaving the vehicle disassembled indefinitely defeats the goal of limiting atmospheric exposure.
When to assign the whole job to a technician
Use a properly equipped A/C technician when the job involves:
- Difficult or unclear access
- A condenser-integrated drier
- Corroded or seized refrigerant fittings
- Uncertain refrigerant or lubricant specifications
- Hybrid or electric-vehicle procedures not covered by available service information
- Compressor debris or widespread contamination
- Refrigerant-line repair
- No reliable way to cap open connections
- Missing torque, evacuation, or leak-check data
- No arrangement for prompt sealed-system service
Gloves and safety glasses remain necessary, but protective equipment does not replace refrigerant-service equipment, technical data, or experience.
The complete replacement workflow
The following is a high-level service chain, not a universal removal procedure. Component access, electrical shutdown, oil accounting, testing, and charging must follow the exact vehicle’s instructions.
Stage 1: Identify the system
Before touching a fitting:
- Confirm that the system uses a receiver-drier.
- Determine whether it is standalone, condenser-integrated, or a serviceable cartridge.
- Verify the replacement part by VIN and original part information.
- Obtain the correct refrigerant and lubricant specifications.
- Identify all required seals and O-rings.
- Obtain fitting and mounting torque values.
- Record the refrigerant charge weight.
- Review the required evacuation, leak-check, and performance-test procedures.
- Read the access and electrical instructions from beginning to end.
This stage should establish whether the condenser must be removed, whether separate cartridge service is factory-supported, and whether contamination requires additional parts.
Stage 2: Recover and prepare
Have the refrigerant properly recovered, then follow the vehicle’s applicable electrical shutdown procedure.
Clean around the drier, condenser chamber, and fittings before disconnecting anything. Prepare correctly sized clean caps or plugs in advance so each opening can be covered immediately.
Stage 3: Remove with contamination control
Disconnect only the fittings identified by the vehicle procedure and use the correct tools for their design.
As each connection is opened:
- Cap the line immediately.
- Plug the component port.
- Keep tools and sealing areas clean.
- Prevent corrosion, dirt, or old seal material from entering the opening.
Remove the mounting hardware and the old drier or desiccant element. Drain or measure removed oil only if the applicable procedure calls for that method. Do not estimate oil quantity from the appearance of a fitting.
Stage 4: Prepare the replacement
Before uncovering the new drier, compare it with the removed component:
- Port location and size
- Flow orientation
- Mounting tabs
- Overall dimensions
- Sensor or switch provisions
- Cartridge dimensions and cap design
- Supplied seals
- Part numbers and markings
Install new compatible O-rings where specified. Use only the prescribed lubricant and application method. Leave the drier’s protective plugs in place while completing unrelated access or bracket work.
Stage 5: Install promptly
Remove the protective plugs at the last practical moment. Keep sealing surfaces clean and install the drier in the correct orientation.
Align the connections properly so the fittings do not cross-thread or damage an O-ring. Tighten the fittings and mounting hardware to vehicle-specific values rather than generic torque figures.
For a cartridge design, follow the specified cap, seal, and retaining procedure. Do not assume that a threaded condenser-chamber cap uses an ordinary pipe-plug procedure.
Stage 6: Finish the sealed-system service
Once the circuit is closed:
- Restore components required for service and testing.
- Evacuate the system according to the applicable procedure.
- Perform the specified leak check.
- Correct identified leaks before charging.
- Recharge with the specified refrigerant by weight.
- Account for lubricant using the approved method.
- Restore disconnected electrical components as directed.
Do not substitute a universal vacuum duration for the manufacturer’s criteria. Generic sources and forum discussions offer differing time recommendations, especially for systems left open for extended periods, so they cannot establish one correct duration for every repair.
A short vacuum-hold result should not be treated as the entire leak evaluation. One forum discussion specifically cautions that a system may pass a short vacuum check yet leak under different conditions (the TDIClub discussion). Use the complete procedure specified for the vehicle and service equipment.
Stage 7: Verify operation
After charging:
- Inspect every disturbed fitting.
- Check for leaks using the specified method.
- Listen for abnormal compressor or fitting noise.
- Confirm required condenser airflow and fan operation.
- Evaluate system pressures under the specified conditions.
- Check relevant refrigerant-line temperatures.
- Measure vent performance as directed.
- Confirm stable compressor and control-system operation.
- Recheck disturbed mounting points and electrical connections.
The vehicle procedure must supply the actual targets and test conditions. Generic values cannot establish whether a particular system is operating correctly.
Special repair paths: compressor failure, contamination, and integrated driers
Some repairs require a broader plan than ordinary receiver-drier replacement.
Compressor failure and metal debris
A failing compressor can release metal or other debris into the circuit. The receiver-drier may capture some contamination and become clogged, but debris can also remain elsewhere. Desiccant itself may break down into small particles and circulate with refrigerant and lubricant (Classic Auto Air’s discussion of compressor debris and desiccant breakdown).
A drier-only repair is incomplete when compressor debris is found. The manufacturer’s contamination procedure must determine the next steps, which may include:
- Identifying the compressor failure mode
- Inspecting accessible oil and ports for debris
- Replacing affected or restricted components
- Cleaning only where the applicable procedure permits it
- Servicing the expansion device where specified
- Correcting the cause of the original compressor failure
- Balancing lubricant according to the replacement procedure
- Documenting parts and work required by the compressor warranty
Do not assume that every component can be cleaned or that every contaminated system requires the same parts. Those decisions are vehicle- and failure-specific.
Desiccant breakdown
Escaped desiccant is a system-wide contamination concern, not merely evidence that the old drier has lost material. Particles may circulate and restrict small passages or remain elsewhere after the drier is replaced.
Determine the extent of contamination and follow the manufacturer’s cleaning or replacement instructions. Installing only a fresh desiccant element may leave the original contamination in the circuit.
Integrated-drier branch 1: Factory-supported cartridge
If factory information and VIN-specific parts data identify a replaceable cartridge, obtain the exact kit and procedure. Confirm whether it includes the cap, seals, or retaining parts and whether any components are single-use.
Keep the cartridge sealed until the chamber is ready. Prevent dirt, corrosion, or old desiccant fragments from entering the condenser chamber.
Integrated-drier branch 2: Cartridge requires condenser removal
A separately available cartridge may be inaccessible with the condenser installed. If the vehicle procedure requires condenser removal, the labor and surrounding disassembly can be much more significant than the cartridge price suggests.
Do not infer in-place access from an aftermarket product photograph.
Integrated-drier branch 3: Complete condenser replacement
Complete condenser replacement may be the specified path when separate desiccant service is unsupported or when the condenser itself is damaged, restricted, or contaminated.
Choose among these branches only after checking factory service information and VIN-specific parts data. The conflicting Subaru forum discussion illustrates why an owner debate cannot settle whether cartridge replacement, condenser removal, or complete condenser replacement is correct for a particular vehicle.
During an extended repair, keep disconnected openings capped and leave the replacement desiccant sealed until installation can proceed and the circuit can be closed promptly.
Budget for the whole service and check the result
The receiver-drier’s shelf price is only one part of the repair. Estimate the complete service before authorizing recovery or beginning disassembly.
Potential cost categories include:
- Standalone receiver-drier, cartridge kit, or complete condenser
- Compatible O-rings and seals
- Specified refrigerant oil
- Refrigerant recovery
- Mechanical labor
- Condenser or front-end removal labor
- Evacuation
- Leak checking
- Refrigerant recharge
- Expansion-device or contamination-related parts
- Compressor and associated components
- Approved cleaning work
- Diagnostic time
- Replacement of damaged lines or fittings
In the supplied AutoZone catalog snapshot, visible receiver-drier prices ranged from $12.99 to $309.99; the observation date was not provided, no vehicle was selected, and fitment was therefore unverified. Prices also vary by location, brand, warranty, inventory, and availability (the unfiltered catalog snapshot).
That range is not a typical part price and does not represent installed cost. An inexpensive cartridge may still require substantial labor if the condenser must be removed. An accessible standalone drier may involve less mechanical labor but still requires recovery, evacuation, leak checking, and a measured recharge.
Completion checkpoints
A complete repair should produce verifiable results:
- The specified refrigerant was charged by weight.
- Lubricant was handled according to the vehicle procedure.
- Disturbed fittings received the correct seals.
- Fasteners were tightened to applicable specifications.
- The system passed the specified leak-check procedure.
- No abnormal compressor or fitting noise is present.
- Pressures and temperatures agree with vehicle-specific targets under the required test conditions.
- Vent performance is consistent with the manufacturer’s procedure.
- Required fans, sensors, and compressor controls operate correctly.
- No known contamination source remains unresolved.
Do not accept a short vacuum-hold result alone as conclusive proof that the repair is complete. It must be considered within the full specified service and verification process.
Final go/no-go checklist
Proceed only if every answer is yes:
- Diagnosis: Is there a supported reason to replace the drier?
- Design: Is the standalone, integrated, or cartridge configuration confirmed?
- Part: Is fitment verified through factory or VIN-specific information?
- Specifications: Are the refrigerant, oil, seal, torque, evacuation, leak-check, and charge data available?
- Recovery: Is proper refrigerant recovery arranged before the circuit is opened?
- Contamination: Is there a complete plan for moisture, compressor debris, or desiccant failure?
- Exposure control: Are clean caps and plugs ready, and can the new drier remain sealed until installation?
- Completion: Are evacuation, leak checking, weight-based recharge, and performance verification arranged?
If any answer is no, stop before opening the circuit. Replace the receiver-drier when diagnosis, known exposure, contamination, compressor damage, or the vehicle’s procedure supports it—not merely because cooling is weak. If factory information, suitable equipment, or a contamination plan is missing, use a properly equipped A/C technician.
Frequently asked questions
Must the receiver-drier be replaced every time the A/C system is opened?
Not as a universally established rule. Several component suppliers recommend replacement whenever the circuit is opened, and some compressor warranties may require it. The supplied evidence does not show that every vehicle manufacturer requires replacement after every brief disconnection that was capped immediately.
Follow the exact vehicle procedure, applicable warranty terms, and actual exposure circumstances. Extended uncontrolled exposure presents a different decision from a brief, promptly sealed opening.
How long can a new receiver-drier remain open before evacuation?
There is no universal safe exposure period in the supplied evidence. Humidity, temperature, airflow, opening size, desiccant capacity, and manufacturer requirements can affect the decision.
Keep the new drier plugged until its connections are ready, install it at the last practical moment, and close the circuit promptly. Do not substitute a forum time estimate for the applicable service procedure.
Can I replace the receiver-drier without replacing the condenser?
Yes, if the vehicle has a separately serviceable receiver-drier or a factory-supported cartridge and the condenser does not otherwise require replacement.
No, if the manufacturer services the drier only as part of the condenser or if condenser damage, restriction, or contamination requires a complete assembly. For an integrated design, verify whether cartridge service is supported and whether condenser removal is required.
Should I replace the receiver-drier when installing a new compressor?
Replacement is supported when an internal compressor failure has introduced contamination, when the vehicle procedure requires it, or when the compressor supplier or warranty makes it a condition of installation.
A new drier is not the entire contamination repair. If debris circulated through the system, inspect and service the remaining circuit according to the manufacturer’s procedure before charging the replacement components.
Do weak cooling or ice on the receiver-drier confirm that it is bad?
No.
Use the vehicle-specific pressure, temperature, airflow, and control-system tests. Replace the receiver-drier only when diagnosis, known exposure, visible damage, contamination, or the applicable service procedure supports it.