
Test the Throttle Signal Before You Buy a Sensor
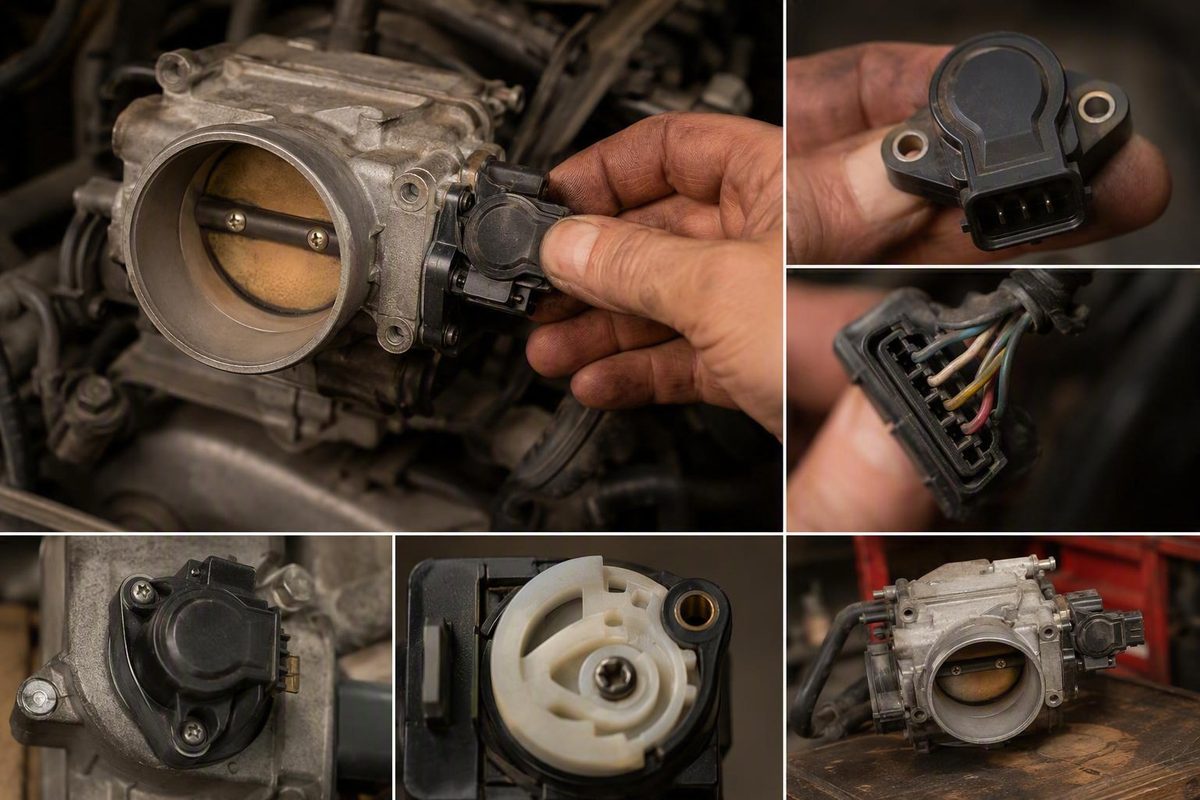
Check reference voltage, ground and signal sweep, then verify connector and shaft geometry, calibration, and whether a full throttle body is required.
There is no universal Honda TPS sensor. Before ordering one, identify the exact vehicle and throttle-body configuration, verify the reference supply, ground, and signal sweep, and determine three separate facts: whether the original-equipment parts channel services the sensor separately, whether a verified aftermarket sensor-only repair exists, and whether that repair can be installed and calibrated on the exact throttle body. Symptoms and trouble codes can point toward the TPS circuit, but neither proves that the sensor itself has failed.
The short answer: identify and test before ordering
Start with this six-item pre-purchase checklist:
- Model year
- Honda model
- Engine
- Trim or VIN
- Part number on the installed sensor or throttle body
- Side-by-side comparison of the connector, mounting pattern, and throttle-shaft slot orientation
The phrase “Honda TPS sensor” is not enough to establish fitment. Retailer catalogs contain many vehicle-specific listings because Honda applications differ by year, engine, trim, and throttle-body design. Enter the complete vehicle information and confirm the listing against the installed part—not merely against “Honda” in the product title.
In one platform-specific example, a CBR600RR owner reported that Dorman 977-023 looked similar to the original sensor on a 2009 motorcycle but would not fit because its slot was positioned differently. That report applies only to the motorcycle in question, but it illustrates why visual similarity does not establish TPS fitment.
Do not drill, file, modify, or install a purchased sensor until you have confirmed fitment and checked the return terms.
Most importantly, do not order a TPS solely because the vehicle hesitates, stalls, idles poorly, accelerates unpredictably, or shifts abnormally. Test the circuit first.
What the TPS does—and what its symptoms do not prove
The throttle-position sensor reports how far the throttle is open. The engine controller uses that information when making fuel-delivery and ignition-timing decisions.
Possible TPS-related symptoms include:
- Hesitation
- Stalling
- Erratic acceleration
- An unstable idle
- Low power
- Poor fuel economy
- Abnormal or poorly timed transmission shifts
- A check-engine light or stored throttle-position code
Hesitation, stalling, and erratic acceleration are recognized generic TPS symptoms in Fluke’s multimeter testing guidance. Unstable idle, reduced economy, low power, and shifting complaints have also appeared in Honda owner reports and aftermarket product material, but those reports establish possible associations—not proof that the TPS caused the problem.
Treat a diagnostic trouble code the same way. Test before replacing anything.
How to test a Honda TPS with a multimeter
Use the wiring diagram and specifications for the exact model year, engine, and throttle-body assembly. Do not assume that wire colors or terminal positions from another Honda are the same.
For a conventional analog TPS, use this key-on, engine-off workflow:
- Obtain the correct wiring diagram. Identify the reference-voltage, sensor-ground, and signal circuits by connector terminal.
- Inspect the circuit first. Look for corrosion, loose or pushed-back terminals, pulled wires, damaged seals, or a connector that is not fully seated.
- Leave the TPS connected. The signal circuit normally needs to remain powered during this voltage test.
- Set the multimeter to DC volts. Select a range suitable for a low-voltage sensor circuit.
- Use non-damaging back-probes. Do not pierce insulation or force probes into connector terminals.
- Connect the meter’s negative lead to a known-good ground.
- Verify the reference supply. Compare the reading with the application-specific service specification.
- Verify the sensor ground. Follow the correct Honda test procedure for that circuit.
- Measure the signal at closed throttle.
- Move through the permitted throttle range slowly. On a mechanically linked throttle, operate the linkage only where the service procedure permits. With electronic throttle control, use the accelerator pedal, a scan-tool command, or another model-specific procedure. Never move the electronic throttle plate by hand unless the applicable Honda procedure expressly directs it.
- Record the open-throttle reading only where the design safely permits the test.
Generic analog sensors often produce low voltage at closed throttle and higher voltage as the throttle opens. Fluke gives approximate screening ranges of 0.4–0.7 volts closed and 4.0–4.8 volts wide open, while emphasizing that specifications vary by vehicle. Its guidance also warns against piercing insulation, bending connector pins, and forcing electronic throttle plates. Use these ranges only for orientation; the correct Honda service information supplies the authoritative targets for the application. See Fluke’s TPS test procedure and safety guidance.
A healthy analog signal should rise smoothly. A sudden jump, dropout, dead spot, or unstable reading deserves further diagnosis, particularly when the reference supply and ground remain stable.
Use this compact decision tree:
| Test result | Most useful next step |
|---|---|
| Reference voltage missing or unstable | Diagnose the supply circuit, connector, and wiring before replacing the TPS |
| Sensor ground poor or unstable | Repair the ground circuit and retest |
| Supply and ground stable, but signal drops out | The sensor becomes more suspect; confirm the signal at the relevant test points |
| Sweep smooth, but endpoints incorrect | Verify specifications, mechanical travel, mounting, fitment, and calibration |
| All readings correct | Investigate other causes of the symptom or code |
Do not rely on generic Honda wire colors. Avoid piercing insulation, spreading or bending connector terminals, shorting adjacent pins, or forcing a probe into a sealed connector.
Multimeter versus scan-tool live data
A scan tool can supplement the multimeter test by displaying TPS voltage or calculated throttle percentage. With the ignition on and the engine off where the application permits, move through the available throttle range slowly and observe the complete sweep rather than one snapshot.
Look for:
- Abrupt percentage or voltage changes
- Fluctuations while the throttle position is held steady
- An incomplete range of travel
- A reading that sticks and then jumps
Do not reject a sensor merely because the scan display does not reach exactly 0% or 100%. Controllers may display or normalize throttle position differently, so use the application-specific expected range.
Direct multimeter measurements remain useful when scan data is abnormal. They show whether the sensor has a stable reference supply and ground and whether its signal changes correctly at the circuit. That helps separate a sensor fault from connector, wiring, or controller-input problems.
Electronic throttle systems may use two position signals. Where fitted, evaluate both under the application-specific service procedure rather than applying a single-sensor test indiscriminately.
Standalone TPS or complete throttle body?
Some older cable-throttle Honda and Acura applications have aftermarket standalone sensors available. Other applications may be serviced through the original-equipment channel only as complete throttle-body assemblies, even though an aftermarket supplier offers a sensor-only repair. Physical replaceability, OE parts availability, and dependable aftermarket serviceability are not the same thing.
| Repair path | When it may apply | Potential benefit | Risks and verification needed |
|---|---|---|---|
| Standalone TPS | A verified aftermarket sensor exists for the exact throttle body | Potentially lower parts cost while retaining the existing body | Confirm connector and shaft geometry, fastener removal, gasket, calibration, warranty, and returns |
| Complete throttle body | The TPS is integrated or separately unavailable through the OE channel, the body has another defect, or reliable calibration cannot be established | Replaces the related assembly instead of assuming sensor-only service is practical | Verify assembly fitment, gasket requirements, and any model-specific relearn |
| No parts yet | Reference voltage, ground, wiring, connector integrity, specifications, or fitment remains unresolved | Avoids buying a part before proving the fault | Continue testing and obtain authoritative fitment and service information |
TechSmart markets T42001 for certain 1988–2001 Honda and Acura applications, not every vehicle in that year range. The manufacturer says its kit includes a TPS, gasket, and mounting hardware, requires removal of the original rivets, and must be calibrated according to the original-equipment service procedure. Those are manufacturer claims for the T42001 repair kit, so exact vehicle and throttle-body coverage still requires confirmation.
Honda Element owner reports illustrate why the choice is application-specific. Some owners described successful repairs after complete throttle-body replacement, while one account described calibration difficulty and unresolved symptoms with a standalone sensor before a complete assembly was installed. Other complaints remained after replacement, showing that reported Element outcomes were mixed.
Neither sensor-only replacement nor complete throttle-body replacement is universally correct. Choose according to verified fitment, serviceability, test results, and the required calibration—not the cheapest listing.
How to compare Honda TPS listings without guessing
Use a structured comparison rather than sorting by price, review score, or marketplace badge.
| Buying criterion | What to verify |
|---|---|
| Verified vehicle fitment | Year, model, engine, trim, transmission where relevant, and VIN range |
| Cross-reference confidence | Match the installed number to an authoritative catalog; do not assume a marketplace replacement number is an official Honda cross-reference |
| Connector and shaft geometry | Connector indexing, terminal count, mounting-hole spacing, shaft-slot shape, orientation, and rotational travel |
| Gasket and hardware | Confirm whether the correct seal, screws, washers, or other hardware are included |
| Calibration instructions | Determine whether rotational adjustment is required and obtain the correct targets and adjustment order |
| Warranty | Check duration, exclusions, and whether labor or consequential damage is excluded |
| Return policy | Confirm return shipping responsibility and whether installed, marked, drilled, or modified parts remain returnable |
| Seller support | Prefer a seller able to resolve fitment using exact vehicle and installed-part information |
Low price, a high review score, a marketplace badge, a broad engine-family claim, or visual similarity does not establish compatibility, signal accuracy, or durability.
For example, SpeedFactory lists SKU SF-01-101 for selected B-, D-, H-, and Accord-only F-series applications and says it includes mounting hardware, a gasket, and a one-year seller warranty. However, its listing does not provide model years, engine codes, connector details, VIN ranges, or an official Honda cross-reference, so the engine-family fitment claim still requires vehicle-level confirmation.
TechSmart’s T42001 is another sensor-only option, but only for covered applications. AutoZone displays multiple Honda TPS brands with vehicle-specific fitment prompts and differing warranty terms. Because listings, prices, warranties, and availability can change, check the retailer’s exact-vehicle results and individual product terms when you are ready to order.
Ask about returns before removing factory fasteners. A low-cost sensor is not a bargain if it cannot be calibrated, does not fit the shaft, or becomes nonreturnable after installation marks or modification.
Installation, calibration, and post-repair checks
Some factory TPS units use rivets, blind bolts, or headless fasteners. Removing them may require destructive, application-specific work. Owner procedures show cutting and drilling methods, but they do not provide formal safety validation or establish adequate clearance and debris control for every throttle body.
If the approved procedure and a safe workholding method are unavailable, replacing the complete assembly or assigning the job to a properly equipped repairer may be the lower-risk choice. Do not copy a forum drilling method merely because the fasteners look similar.
Do not treat the throttle-stop screw as a routine TPS adjustment. Owner procedures sometimes alter it to reach a voltage target, but those methods are application-specific and are not substitutes for Honda service information. Preserve the factory stop setting unless authoritative instructions for the exact throttle body expressly direct otherwise.
During installation:
- Use a new, application-correct gasket or seal where specified.
- Install the specified hardware without overtightening a plastic sensor housing.
- Keep connector terminals clean, straight, and dry.
- Prevent metal chips, gasket debris, and dirt from entering the throttle body or intake.
- Confirm that the throttle linkage or cable moves freely where applicable.
- Route wiring away from moving or hot components.
A replacement TPS may require rotational calibration while connected, with the ignition on and the engine off. The exact closed-throttle target, open-throttle target, adjustment order, fastener torque, and acceptable tolerance must come from service information for that Honda model and throttle body. Do not substitute a forum value from another engine.
Check the applicable procedure before installation so you know whether the vehicle requires a scan tool, a specified operating sequence, or no separate relearn.
After the repair:
- Recheck the reference supply and sensor ground.
- Verify a smooth signal through the full permitted sweep.
- Confirm the application-specific closed and open endpoints.
- Inspect the gasket, intake ducting, vacuum connections, and electrical connector.
- Record stored and pending codes before clearing them.
- Perform any specified idle or throttle relearn.
- Confirm normal idle, throttle response, and return to closed throttle.
- Recheck for pending codes and intake leaks after the road test.
If symptoms or codes remain, return to circuit and system diagnosis. Do not assume automatically that the new sensor is defective, and do not continue replacing parts without a new test result.
Honda motorcycles require a separate procedure
Honda automobiles and motorcycles must not share assumed wire colors, connector terminals, blink-code meanings, voltage specifications, fitment, or calibration steps.
CBR600RR owner material shows only that recurring principles may apply across platforms: a three-wire sensor can have supply, ground, and signal circuits, and the signal can be evaluated for a smooth sweep. The actual circuits, values, diagnostic codes, mechanical access, and adjustment procedure can still differ by motorcycle model and year.
Obtain service information for the exact motorcycle before probing a connector, adjusting a sensor, or ordering a replacement. Do not reproduce an owner’s drilling method as a recommended procedure; informal instructions do not establish safe tool clearance, debris control, or protection for surrounding components.
The final decision has three parts: verify exact fitment, prove the circuit and signal fault, and confirm whether the application supports a dependable sensor-only repair or requires a complete throttle-body assembly. If authoritative specifications or fitment remain unavailable, pause the purchase rather than guessing.