
Find the Cooling-System Fault Before Replacing Parts
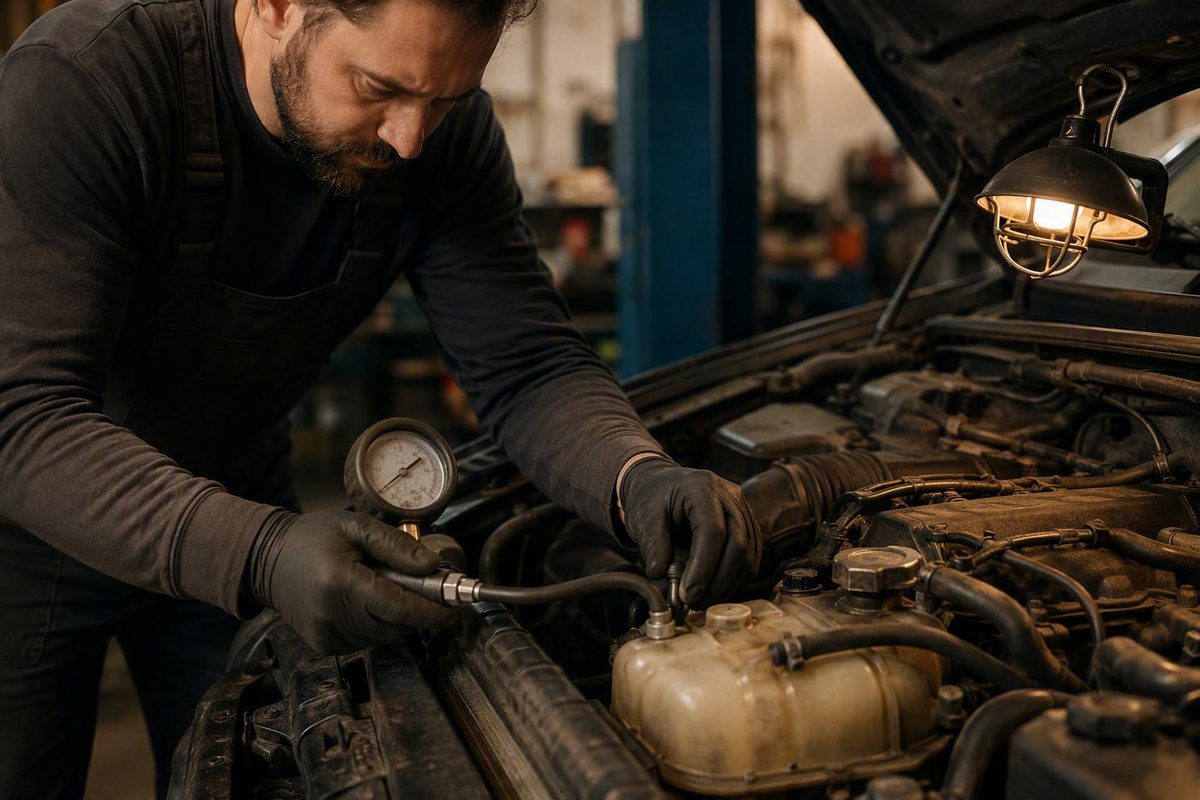
Safe triage, visual inspection, pressure tests and symptom tables isolate leaks, airflow, circulation and possible internal-engine faults.
Auto cooling system repair should begin with safe triage and testing, not a guess based on the most visible symptom. Overheating, coolant loss, steam, weak cabin heat, and temperature fluctuations can result from external leakage, poor circulation, insufficient radiator airflow, pressure loss, trapped air, or an internal engine problem. More than one fault can also be present.
The immediate priorities are to protect people from hot, pressurized coolant and prevent additional engine damage. Once the vehicle is completely cool, diagnosis should establish which function has failed. Only then can you distinguish a coolant-maintenance need from a mechanical or electrical repair.
Overheating Triage: When to Stop Driving Immediately
Use the most serious symptom present to decide what to do. A gauge that temporarily returns to normal does not prove the vehicle is safe, and a leak that looks small does not show how much coolant remains.
| Triage level | Examples | Immediate action |
|---|---|---|
| Monitor only after a cool-engine check | No warning light or steam; temperature remains stable; coolant is at the specified cold level; no recurring loss or fresh residue | Record what happened, inspect again after the next complete cool-down, and continue monitoring |
| Schedule prompt diagnosis | Sweet odor, dried coolant residue, weak cabin heat, intermittent temperature fluctuation, or falling coolant level without active overheating | Avoid unnecessary driving, check the level only when fully cool, and arrange diagnosis before the condition worsens |
| Stop driving | Red temperature warning, gauge in the red zone, visible steam, rapid coolant loss, or severe overheating | Pull over safely, switch off the engine, and let the system cool completely, as advised in this radiator and cooling-system warning guide |
| Tow or seek professional help | Overheating returns, coolant is pouring out, the vehicle cannot retain coolant, fluids appear mixed, or the correct refill procedure is unknown | Arrange transport and diagnosis rather than driving without enough coolant, which can contribute to head-gasket or major engine failure according to Firestone’s cooling-system guidance |
Never open a hot radiator cap or pressurized coolant-reservoir cap, and never connect a pressure tester to a hot system. Escaping coolant or steam can cause serious burns. Wait until the engine and cooling system are completely cool before inspecting the level or removing a cap, as emphasized in AutoZone’s coolant-leak safety guidance.
Do not decide that a vehicle is safe to drive merely because a puddle is small. The visible amount on the ground does not reveal how much coolant remains, whether the leak becomes worse under pressure, or whether coolant is also escaping elsewhere.
If a warning appears, document the event when it is safe to do so:
- Which warning light illuminated
- Where the temperature gauge started and how quickly it moved
- Whether the temperature rose at idle, at highway speed, under load, or with the heater operating
- The color and approximate location of any puddle
- Whether steam came from the front, rear, or one side of the engine compartment
- Any sweet odor inside or outside the cabin
- Changes in cabin-heat output
- When coolant was last added and approximately how much
- Recent cooling-system, engine, belt, or front-end repairs
Photographs of the gauge, warning message, puddle, and residue can help classify an intermittent complaint. Do not remain in an unsafe traffic location to collect them.
How the Cooling System Controls Engine Temperature
The cooling system is a loop that moves heat away from the engine. The water pump circulates coolant through engine passages, where the fluid absorbs heat. Heated coolant then travels to the radiator. Air passing through the radiator carries heat away, and the cooled fluid returns to the engine.
The thermostat regulates coolant flow in response to engine temperature. It is not a cooling device by itself. If it does not open appropriately, circulation through the radiator may be restricted. If it remains too open, engine warm-up and cabin heat can be affected.
Air reaches the radiator in two principal ways: vehicle movement pushes air through the radiator face, and one or more cooling fans create airflow when road speed is insufficient. An engine that overheats mainly in slow traffic or while idling may therefore require fan, control, wiring, or airflow diagnosis rather than immediate radiator replacement.
The pressure cap is also an operating component, not simply a lid. It helps control system pressure and coolant movement between the pressurized circuit and reservoir. A cap that cannot seal or manage pressure correctly may allow coolant loss or abnormal reservoir behavior. The correct cap rating is vehicle-specific; there is no universal pressure specification.
The heater core is a smaller heat exchanger within the coolant circuit. Hot coolant passing through it supplies heat for the cabin. Low coolant, trapped air, restricted flow, or a heater-core fault can therefore affect heater output. HVAC doors and controls can cause poor heat as well, so the symptom must be evaluated in context.
A practical diagnosis can organize possible faults into six categories:
- External leakage: Radiator, hoses, clamps, reservoir, cap area, water pump, thermostat housing, heater hoses, or heater core.
- Circulation failure: Water-pump trouble, a thermostat that is not functioning correctly, a drive-belt problem on applicable designs, or an internal restriction.
- Airflow failure: Inoperative fans, electrical-control faults, a damaged shroud, bent fins, or debris blocking the radiator face.
- Pressure-control failure: A faulty cap, damaged sealing surface, reservoir-flow problem, or another fault that prevents the system from retaining and managing pressure.
- Trapped air or incorrect fill: Incomplete bleeding, an improper refill method, low coolant, or an incompatible coolant mixture.
- Possible internal engine leakage: Coolant entering a combustion chamber or mixing with engine oil because of gasket, cylinder-head, or block damage.
These categories can overlap. Low coolant can reduce circulation, introduce air, weaken cabin heat, and eventually cause overheating.
A cooling-system symptom does not automatically mean the radiator is bad. The radiator should be repaired or replaced only when testing or direct inspection confirms that it leaks, is damaged, cannot transfer heat adequately, or has a relevant restriction.
Cooling-System Symptoms and What They Can—and Cannot—Tell You
Symptoms narrow the diagnostic path, but they rarely identify a component conclusively. The next useful test should investigate the relevant fault category rather than validate a preferred parts purchase.
| Symptom | Urgency | Plausible fault categories | Next useful test |
|---|---|---|---|
| Rising or fluctuating temperature gauge | Prompt diagnosis; stop if it reaches the red zone | Low coolant, leakage, trapped air, thermostat or pump trouble, fan fault, restriction, internal leakage | Cool-engine inspection, coolant-level check, pressure test, fan check, and circulation assessment |
| Temperature warning light | Stop if red or accompanied by overheating | Any major loss of cooling capacity | Shut down, cool completely, and inspect before restarting |
| Steam under the hood | Stop immediately | Active external leak, coolant discharge, pressure-control problem, severe overheating | Arrange transport or inspect only after complete cool-down; pressure-test if appropriate |
| Colored puddle | Prompt diagnosis; stop if the level is low or temperature rises | External leak from radiator, hose, connection, pump, housing, reservoir, cap area, or heater circuit | Clean and inspect the area, then pressure-test if needed |
| Recurring low coolant | Prompt diagnosis | External leak, cap loss, heater-core leak, incorrect fill, internal leak | Verify the cold level, inspect for residue, and perform targeted leak testing |
| Sweet odor | Prompt diagnosis | Hot external leak, reservoir discharge, heater-core leak | Inspect outside and inside the cabin; consider pressure or compatible dye testing |
| Weak cabin heat | Prompt diagnosis if paired with coolant loss or temperature changes | Low coolant, trapped air, thermostat issue, heater-core restriction or leak, HVAC-control fault | Check coolant level cold, compare engine-temperature behavior, and evaluate heater flow and HVAC controls |
| Damp cabin carpeting or greasy windshield film | Prompt diagnosis | Heater-core or heater-hose leak | Inspect the heater circuit and check for coolant odor or residue |
| Bubbles in the reservoir | Prompt diagnosis; stop if overheating | Trapped air, improper fill, local boiling, pressure problem, possible combustion-gas intrusion | Review filling and bleeding history; perform pressure or internal-leak testing if justified |
| Persistent white exhaust after warm-up | Prompt professional diagnosis | Coolant entering a combustion chamber, but also possible non-coolant causes | Check for coolant loss and perform appropriate internal-engine tests |
| Milky oil or oily coolant | Avoid continued operation until evaluated | Coolant-oil cross-contamination, condensation, cooler-related fault, gasket, head, or block damage | Inspect both fluids and perform targeted engine or cooler testing |
| Warm A/C air | Usually separate unless other cooling symptoms exist | Refrigerant, compressor, airflow-door, electrical, or other A/C fault | Diagnose the air-conditioning system; do not infer an engine cooling fault from this symptom alone |
Coolant is sold in multiple colors, so puddle color may suggest coolant but cannot identify the leaking component. Inspect the radiator seams and tanks, upper and lower hoses, clamps and quick connections, reservoir, cap area, water-pump region, thermostat housing, heater hoses, and visible portions of the heater circuit.
Coolant can also disappear without leaving a puddle. A leak may occur only while the system is hot and pressurized, then evaporate on an engine surface. A weak cap may release vapor or coolant. A heater-core leak may remain inside the cabin, while an internal leak may send coolant into the oil or a combustion chamber.
Weak cabin heat is a clue, not a diagnosis. Low coolant or trapped air can reduce flow through the heater core. A thermostat fault can affect coolant temperature, and the heater core itself may leak or become restricted. An unrelated HVAC blend-door or control fault may produce the same complaint even when engine cooling is normal.
Persistent white exhaust after warm-up, bubbles in the reservoir, milky oil, oily coolant, or other cross-contamination justifies investigation for internal leakage. None of these observations alone proves a failed head gasket. Internal-engine testing must distinguish among these possibilities.
Engine cooling and air conditioning should also remain separate in the diagnosis. They may share airflow across heat exchangers and some vehicle-dependent controls, but warm air from the A/C vents alone does not establish a coolant, radiator, thermostat, or water-pump failure.
A Diagnosis-Before-Parts Cooling-System Inspection
Begin only when the engine is completely cool. The objective is to confirm the complaint, classify it, and gather evidence before disturbing the system.
1. Confirm the complaint and history
Determine when the problem occurs:
- At cold start, after warm-up, or only after a long drive
- At idle, in traffic, at highway speed, or while climbing
- Continuously or intermittently
- Before or after coolant service, belt work, collision repair, or engine repair
- With coolant loss, steam, odor, weak heat, warning lights, or unusual noises
- After prior overheating events or repeated top-offs
On vehicles that provide relevant diagnostic data, a qualified technician may compare electronic temperature or fan-control information with physical test results. Such data should not be treated as proof that a named component has failed.
2. Check coolant level and condition
Following the owner’s manual, inspect the specified reservoir or fill point only when the system is fully cool. Note whether the level is below the cold mark, overfilled, or inconsistent after repeated cool-downs.
Observe the fluid without assuming color alone establishes condition or compatibility. Look for oil, sludge, particles, rust-like contamination, or obvious mixing. If the coolant type is unknown, do not add a generic formula merely because its color appears similar.
3. Perform a systematic visual inspection
With the engine switched off and cool, use good lighting and inspect from the highest visible point downward. Look for fresh wetness, dried crust, colored staining, spray patterns, swollen or chafed hoses, loose connections, damaged plastic fittings, and reservoir cracks.
Include:
- Radiator core, tanks, seams, drain area, and hose connections
- Reservoir, cap, overflow or return hose, and sealing surfaces
- Upper, lower, bypass, and accessible heater hoses
- Thermostat housing and nearby gaskets
- Water-pump area and any visible vent or weep path
- Drive belt and related components where the pump is belt-driven
- Cooling-fan blades, shrouds, connectors, and visible wiring
- Radiator and condenser faces for debris or physical damage
- Cabin carpeting and other accessible heater-core evidence
- Undertrays or shields that may catch and relocate leaking fluid
Document evidence before cleaning the area. Do not place hands, clothing, or tools near belts or fan blades. Radiator-access work can require battery disconnection and other electric-fan precautions depending on the vehicle, as noted in Mobil’s radiator replacement guidance.
4. Test system pressure when leakage is suspected
A cooling-system pressure tester applies controlled pressure to help expose leakage without relying solely on engine heat. Begin with a completely cool system and pressurize it only to the vehicle manufacturer’s specification. Opening or testing a hot, pressurized cooling system can release scalding fluid or steam, a hazard also identified in CRC Industries’ cooling-system guidance.
Observe the gauge and inspect for fluid at hoses, connections, radiator seams, the reservoir, cap area, water pump, thermostat housing, heater circuit, and other accessible points. A falling reading is consistent with pressure loss, but it does not automatically identify where the pressure went.
A pressure test has limitations. It may show pressure loss without exposing a concealed heater-core or internal-engine leak.
5. Test the cap separately where appropriate
A cap may appear intact but fail to seal or manage pressure correctly. Use the appropriate adapter and the vehicle-specific specification. Inspect the cap, neck, locking surfaces, and seals as a system; replacing a cap cannot correct a damaged filler neck or reservoir sealing surface.
6. Evaluate fans and controls
When overheating is worse at idle or low road speed, determine whether the cooling fan operates under the conditions specified for the vehicle. Follow-up diagnosis may include the fan motor, wiring, connectors, relays, modules, or control inputs, depending on the design.
Do not condemn a motionless fan without establishing that it should have been operating under the observed conditions. Fan testing and electrical diagnosis should follow service information for the exact vehicle.
7. Match follow-up testing to the suspected category
- External leakage: Pressure testing, careful visual inspection, or compatible ultraviolet dye testing
- Airflow fault: Fan and control checks, shroud inspection, and examination for blocked or damaged fins
- Circulation fault: Thermostat, pump drive, temperature distribution, and flow-related checks appropriate to the vehicle
- Pressure-control fault: Cap and sealing-surface tests
- Trapped air or incorrect fill: Review recent service, coolant level, refill equipment, and the prescribed bleeding procedure
- Possible internal leakage: Appropriate combustion-gas, cylinder, cooling-system, oil, or component-specific testing
No single test fits every complaint. Use the owner’s manual for owner-level checks and coolant specifications. For test pressure, electrical commands, connector information, tightening specifications, refill steps, and bleeding procedures, consult an official manufacturer service portal, authorized service information, or a qualified technician.
Coolant Top-Off, Drain-and-Fill, Flush, or Mechanical Repair?
These actions solve different problems. Calling all of them “cooling-system service” can hide whether the vehicle received maintenance or an actual repair.
Coolant top-off
A top-off restores the level. It may be necessary after a verified service loss or while completing a prescribed level check, but it does not repair recurring coolant loss. If coolant must be added repeatedly, the system has an unresolved leak, filling issue, or internal consumption problem.
Before adding fluid, identify the correct specification and whether the manufacturer requires a premixed product or a particular water-to-concentrate ratio. Do not open the system hot or overfill the reservoir.
Drain-and-fill
A drain-and-fill removes some or most of the accessible old coolant and replaces it with the specified fluid. How much is removed depends on system design and available drain points.
This can be appropriate maintenance when specified by the manufacturer or when required as part of a repair. It is not automatically equivalent to a complete exchange or flush.
Coolant flush
A flush is a more extensive attempt to remove old coolant or contamination. Equipment and procedures vary. Flushing may be considered for degraded or contaminated fluid or certain removable deposits, but it should not be presented as the default answer to active overheating.
A flush cannot seal a leaking hose, repair a cracked radiator, restore a failed pump, correct a defective thermostat, power an inoperative fan, repair a heater core, or reverse internal engine damage. Diagnose active leakage, overheating, or circulation trouble before authorizing a flush as the solution.
Mechanical or electrical repair
A confirmed failed component requires correction of that fault. Depending on the findings, this can mean replacing a hose, clamp, cap, reservoir, thermostat, gasket, pump, fan, relay, control component, heater core, or radiator. Internal engine leakage requires a separate repair decision based on engine testing and the vehicle’s overall condition.
Coolant formula, concentration, capacity, maintenance interval, refill sequence, and bleeding method vary by vehicle and engine. The owner’s manual and manufacturer service information should control these decisions; even commercial service guidance defers coolant intervals and specifications to manufacturer requirements, as shown in this cooling-system service overview.
Do not mix coolant types based on color alone. Similar colors can represent different formulations, while different colors do not automatically prove incompatibility. If compatibility cannot be verified, obtain the correct specification before adding fluid.
Bleeding is part of the repair, not an optional finishing step. The required equipment and sequence are vehicle-specific, so a generic instruction to “run it with the cap off” is not suitable for every design.
Common Repairs and When a Radiator May Need Replacement
The durable repair should correspond to the confirmed failure:
| Confirmed fault | Typical durable repair direction |
|---|---|
| Split, swollen, hardened, or chafed hose | Replace the damaged hose and any unsuitable clamp; inspect nearby hoses and routing |
| Loose or failed connection | Correct the connection with specified parts and inspect the mating surface |
| Cap that fails its test | Replace it with the correct specification after confirming the neck or reservoir is sound |
| Cracked or leaking reservoir | Replace the reservoir or related fitting and verify cap and hose operation |
| Thermostat or housing leak or failure | Replace the failed thermostat, seal, housing, or relevant combination as specified |
| Water-pump leakage or functional failure | Replace the pump and address any relevant belt, tension, drive, or contamination issue |
| Inoperative fan or control | Repair the verified motor, relay, wiring, module, connector, or control fault |
| Heater-core leak | Repair or replace the leaking heater-circuit component and evaluate cabin contamination and access requirements |
| Radiator leak, damage, or confirmed restriction | Professionally repair it when suitable or replace it when repair is impractical or unreliable |
| Internal engine leakage | Perform engine-specific testing and choose repair, replacement, or another course based on confirmed damage |
The guiding rule is simple: confirm the source or failed function first. A puddle near the front of the vehicle is not enough to condemn the radiator. Coolant may have traveled from a hose, reservoir, water pump, thermostat housing, or another connection.
Minor, accessible radiator damage may sometimes be repairable after professional evaluation. Suitability depends on radiator material, damage location, tank and core condition, accessibility, contamination, and whether a reliable repair process exists for that construction.
Replacement is more likely to make sense when there are:
- Multiple or repeated leaks
- Cracked plastic tanks
- Widespread corrosion
- Extensive internal clogging
- Large or inaccessible core damage
- Substantial prior repairs
- Damage to mounting or sealing areas
- A repair cost approaching the cost of a suitable replacement
These factors are also identified in a commercial radiator repair-versus-replacement discussion, but the final decision still depends on the actual radiator and vehicle.
External debris and internal deposits are different faults. Leaves, plastic, insects, dirt, or bent fins on the radiator face can restrict airflow. Internal deposits or damaged tubes can restrict coolant flow. An external cleaning assessment cannot establish that internal passages are clear, and a coolant exchange cannot straighten damaged fins or restore a missing shroud.
What about stop-leak products?
Commercial guidance does not agree on these products. One tool retailer describes stop-leak as a possible patch for a minor radiator leak while acknowledging that the leak may return and that the product will not repair cap or hose leaks in its radiator repair discussion.
By contrast, a radiator-service provider warns that liquid stop-leak may obstruct internal channels and reduce coolant flow in its repair-or-replace analysis.
Treat stop-leak as a disputed temporary measure, not as the equivalent of mechanical repair. It will not correct a split hose, loose connection, failed fan, damaged cap, bad pump, thermostat fault, or severe internal-engine leak.
Material-specific repair, pressure integrity, difficult access, electrical fans, nearby systems, and engine measurement requirements can make these specialist jobs.
DIY Boundaries and Post-Repair Verification
Reasonable owner checks are deliberately limited:
- Record warnings, gauge movement, odors, noises, and driving conditions
- Allow the vehicle to cool completely
- Check the specified reservoir level according to the owner’s manual
- Look for accessible wet areas, stains, residue, damaged hoses, or loose-looking connections
- Photograph evidence and track how often coolant has been added
- Check whether debris visibly blocks the radiator face without reaching near moving parts
Obtain professional help when there has been severe overheating, the engine cannot retain coolant, internal leakage is suspected, electrical fan diagnosis is required, or components are difficult to access. Escalation is also prudent when the correct bleeding procedure is unknown, transmission-cooler lines attach to the radiator, or the job exceeds the available tools and experience.
Some radiators incorporate automatic-transmission cooler connections, creating a second fluid circuit that must remain sealed. A replacement part must match the exact engine, transmission, cooling package, and installed equipment.
After any repair, verify the result rather than assuming that the absence of an immediate puddle means success.
Post-repair checklist
- [ ] Confirm that the installed part and connections match the vehicle configuration.
- [ ] Refill with the specified coolant and concentration.
- [ ] Complete the manufacturer-required bleeding procedure.
- [ ] Inspect every disturbed connection.
- [ ] Verify stable engine temperature during a controlled initial check.
- [ ] Confirm cooling-fan operation using the applicable vehicle procedure.
- [ ] Inspect for coolant leaks while respecting hot-system boundaries.
- [ ] If radiator cooler lines were disturbed, inspect for transmission-fluid leakage.
- [ ] Confirm that fan blades clear the shroud, wiring, and hoses.
- [ ] Recheck the coolant level after complete cool-down.
- [ ] Repeat the cold-level and leak inspection over subsequent heat-and-cool cycles.
During the initial controlled road check, monitor the temperature gauge and warning indicators. Stop safely and shut off the engine if abnormal temperature rise, a red warning, or steam returns.
Collect used coolant in a suitable closed container, keep it inaccessible to children and animals, and take it to an appropriate disposal or recycling facility. Antifreeze is poisonous to many animals, a hazard noted in Mobil’s radiator and coolant guide.
Generic instructions cannot replace service information for the exact year, make, model, engine, transmission, and cooling-system configuration. If pressure testing, electrical diagnosis, bleeding, or internal-engine testing exceeds safe DIY limits, use a qualified technician.
Repair Estimates, Shop Questions, and Preventive Maintenance
The available evidence does not support one dependable price for cooling-system diagnosis or repair. A cap, hose, fan circuit, radiator, water pump, heater core, and internal engine leak represent very different jobs.
Estimate variables include:
- Exact vehicle, engine, transmission, and cooling package
- Component location and access
- Required bumper, support, fan, intake, dashboard, or underbody disassembly
- Original-equipment, aftermarket, new, remanufactured, or repaired parts
- Local labor rates and diagnostic practices
- Coolant specification and required quantity
- Refill, bleeding, programming, or vehicle-dependent service needs
- Broken fasteners, corrosion, or damaged connectors
- Transmission-cooler or other integrated connections
- Secondary engine damage from overheating
For narrow context only, AutoZone publishes a broad coolant-leak repair estimate of $100 to more than $1,000, depending on leak location and damage, in its coolant-leak repair guide. This is a commercial estimate, not a universal quote.
Hoover Street Auto Repair separately publishes an approximate thermostat-replacement range of $200 to $600 in its cooling-system service guide. That figure is also commercial and cannot price a particular vehicle without inspection.
Published service times require the same caution. One commercial shop lists approximately 30 minutes for pressure testing, 60 minutes for a flush and fill, and 120 minutes for radiator replacement on its cooling-system service page. These are shop-specific promotional estimates; access, testing needs, system complexity, and bleeding requirements can change the actual time substantially.
Questions to ask before authorizing a repair
-
What test results support the diagnosis? Ask what was observed, which tests were performed, and how the results identify the recommended repair.
-
Was the entire relevant system checked? A radiator recommendation should account for hoses, cap, reservoir, pump, thermostat, fans, airflow, coolant condition, and evidence of internal leakage where applicable.
-
What does the diagnostic fee cover? Clarify whether it includes visual inspection, pressure testing, cap testing, fan or control checks, dye, internal-leak tests, or necessary disassembly.
-
Can I receive an itemized written estimate? It should separate parts, labor, coolant, diagnostic charges, taxes, shop supplies, and optional work.
-
What part will be installed? Request the brand, part type, quality level, and whether related seals, clamps, fasteners, or hoses are included.
-
What additional work requires approval? Establish repair-authorization limits and how the shop will contact you if it finds secondary damage.
-
How will the system be refilled and verified? Ask whether the specified coolant and applicable bleeding procedure will be used and what post-repair checks are included.
-
What is the expected completion time? Treat it as an estimate, especially when diagnosis or disassembly may expose additional faults.
-
What written warranty applies? Ask for parts-and-labor coverage, duration, exclusions, transferability, and the procedure if the symptom returns.
-
Will I receive the test findings and final invoice? Records can help if overheating returns or related work is needed later.
Preventive attention should focus on early evidence rather than a universal replacement schedule. Periodically check the specified cold coolant level and look for contamination. Inspect accessible hoses, belts, cap seals, reservoir condition, radiator airflow, and dried leakage residue. Address recurring loss, odor, temperature fluctuation, or weak heat before a warning reaches the red zone. Follow the manufacturer’s coolant interval rather than adopting a generic mileage or time rule.
Engine Repair Zone describes itself as a publisher covering engine symptoms, diagnostic tests, and possible fixes in its editorial overview. The available information does not establish it as a repair shop, appointment service, parts seller, or repair-warranty provider.
Its articles are informational and subject to the site’s stated terms for using published guidance. Vehicle-specific safety and repair decisions should therefore be checked against manufacturer information or reviewed by a qualified technician.
Frequently Asked Questions
Can I drive with a coolant leak or an overheating engine?
Do not drive when the vehicle has a red temperature warning, a gauge in the red zone, visible steam, rapid coolant loss, or severe overheating. Pull over safely and shut off the engine, consistent with published overheating triage guidance.
A small-looking leak is not automatically safe because puddle size does not establish the remaining coolant level or how the system behaves under pressure. If the vehicle cannot retain coolant or overheating returns, arrange transport and diagnosis.
What does a cooling-system pressure test reveal?
A pressure test can expose external leaks and show whether the system is losing pressure. A falling gauge reading is consistent with pressure loss, but the reading alone may not locate the source.
Further inspection may be needed to distinguish a cap problem from another leak or to investigate concealed, intermittent, temperature-dependent, or internal faults. A stable static test does not rule out every cooling-system problem.
Why is coolant disappearing when there is no puddle?
Coolant may leak only when the system is hot and pressurized, then evaporate before reaching the ground. It may also escape through a weak cap, collect inside the cabin from a heater-core leak, enter the oil or combustion chamber through an internal fault, or collect on an undertray.
Diagnosis may require a cap test, system pressure test, compatible dye inspection, heater-circuit assessment, or internal-leak testing.
Will a coolant flush fix an overheating problem?
Only when testing shows that the problem involves fluid condition or removable contamination that the specified service can address. A flush cannot repair a leaking hose, cracked radiator, failed pump, defective thermostat, inoperative fan, heater-core leak, or internal engine damage.
Active overheating should be diagnosed before a flush is presented as the solution. The correct coolant and vehicle-specific bleeding procedure remain essential after any coolant service.
Should a leaking radiator be repaired or replaced?
Repair may be reasonable for limited, accessible damage when the radiator material, location, and overall condition permit a reliable professional repair.
Replacement becomes more compelling with cracked plastic tanks, multiple or recurring leaks, widespread corrosion, severe internal restriction, extensive prior repairs, or repair cost close to replacement cost. First confirm that the radiator is actually the source; hoses, connections, caps, reservoirs, pumps, and thermostat housings can leak nearby.
The Diagnosis-Before-Parts Bottom Line
When overheating is severe, stop safely, switch off the engine, and allow the system to cool completely. Do not open a hot cap or pressure-test a hot system.
Once the vehicle is cool, classify the problem as external leakage, circulation failure, airflow failure, pressure-control failure, trapped air or incorrect fill, or possible internal engine leakage. Require inspection and test results before authorizing replacement parts.
The correct repair, coolant specification, pressure limit, refill method, and bleeding procedure depend on the exact vehicle. Use the owner’s manual and official manufacturer service information, or consult a qualified technician when pressure testing, electrical diagnosis, bleeding, or internal-engine testing exceeds safe DIY limits.