
Restore a Firm Clutch Pedal Without Letting Air Back In
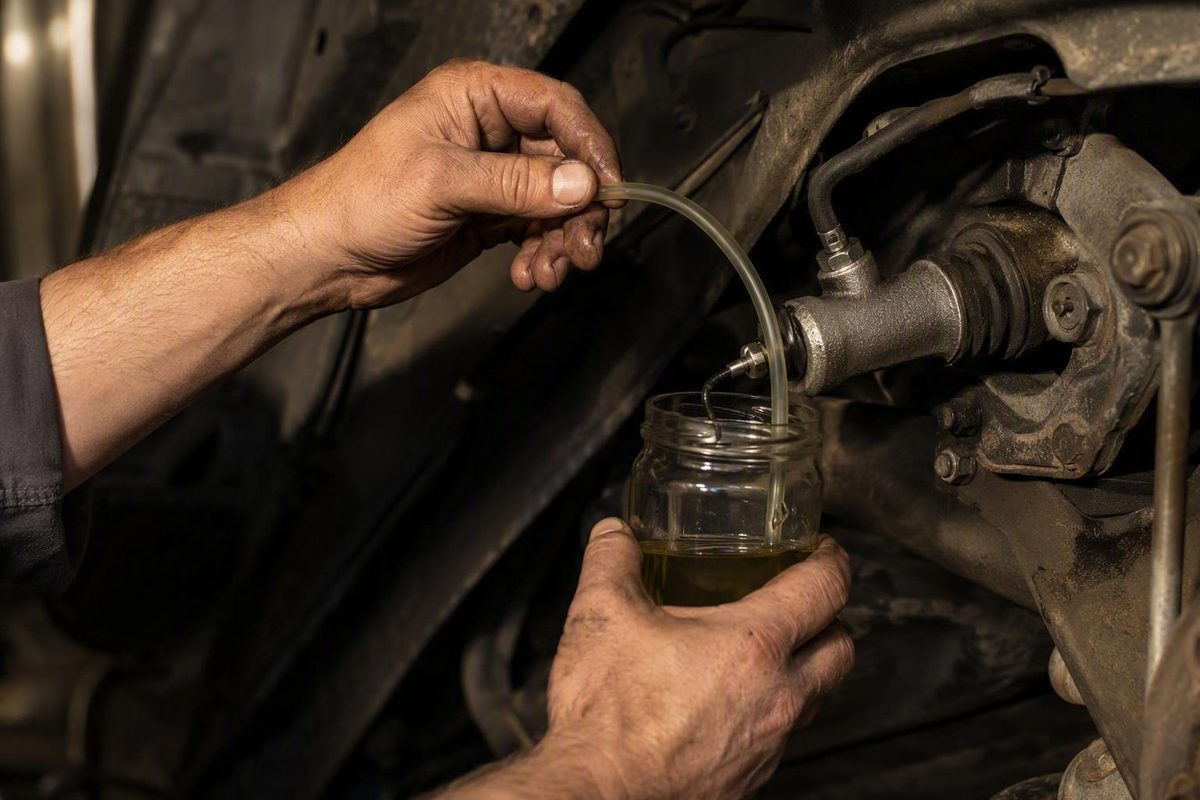
Bleeding a hydraulic clutch means moving fresh, specified fluid through the circuit while allowing trapped air to escape at the slave cylinder. The basic job is straightforward, but the order matters: releasing the pedal with the bleeder open can draw air back into the system, and letting the reservoir uncover the clutch-feed port introduces new air upstream.
For most accessible systems, begin with the conventional two-person method:
Press and hold the clutch pedal → open the bleeder → let fluid and air escape → close the bleeder → release or manually raise the pedal.
Keep the reservoir above the clutch-feed port throughout the job. If several bubble-free cycles do not produce stable pedal feel and reliable clutch disengagement, stop bleeding and diagnose the fault. More pedal strokes cannot repair a leak, failed seal, installation error, or mechanical clutch problem.
Application-specific methods
The standard manual sequence is the baseline in this guide. Do not pressure bleed, reverse bleed, move or compress a slave cylinder, or manipulate an internal concentric slave unless the service information for the exact vehicle authorizes the method and supplies any required limits, orientation, and torque specifications.
Before You Start: Confirm the Vehicle-Specific Requirements
This is a general guide to how to bleed a clutch slave cylinder. The owner’s manual, workshop manual, or manufacturer service information for the exact vehicle takes priority. Before opening the bleed screw, confirm:
- The required hydraulic-fluid specification
- The approved bleeding sequence
- The required vehicle position
- Whether pressure, vacuum, gravity, or reverse bleeding is permitted
- The maximum approved pressure for a pressure bleeder
- The bleed-screw tightening torque
- Approved lifting and support points
- Whether replacement parts require bench bleeding or priming
- Whether the system has a second or upper bleeder
- Whether a special routine is required after the circuit has drained
Do not transfer instructions from another make, model, or model year without verification. Similar-looking clutch systems can differ in reservoir layout, line routing, slave design, and the points where air collects.
Identify the reservoir arrangement
Some hydraulic clutches use a dedicated reservoir. Others draw from the brake-fluid reservoir.
In a shared reservoir, the clutch-feed port may be above the reservoir’s bottom. The clutch circuit can therefore ingest air while fluid remains visible for the brake circuit. Keep the fluid comfortably above the clutch-feed port throughout bleeding; do not treat any visible fluid as sufficient. This concern is documented in vehicle-specific guidance for shared-reservoir systems (Audizine clutch bleeding guide).
Use only the fluid specification stated in the vehicle’s service information or printed on the reservoir cap. Do not choose DOT 3, DOT 4, or another specification simply because it is common.
Determine whether the slave cylinder is external or internal
An external slave cylinder is mounted outside the bellhousing. Depending on the vehicle, its body, pushrod, hydraulic connection, and bleeder may be accessible from above or below.
An internal concentric slave cylinder surrounds the transmission input shaft inside the bellhousing. Do not unbolt, rotate, compress, or otherwise manipulate an internal slave as though it were an external cylinder. If its procedure is unclear, stop and obtain the correct service information.
Also check for:
- A remote bleeder
- An additional upper bleeder
- A prescribed sequence involving multiple bleed points
- A master- or slave-cylinder priming procedure
- A requirement to bench bleed a replacement component
Inspect before opening the system
Do not begin if you find:
- A seized, badly corroded, rounded, cracked, broken, or leaking bleeder
- Contaminated or visibly incorrect fluid
- Uncontrolled leakage from a hose, line, fitting, master cylinder, or slave
- An external slave pushrod that is not seated correctly
- No safe way to reach the component
- Uncertainty about the procedure for an internal slave
Forcing a damaged bleed screw can turn a bleeding job into a cylinder replacement. Bleeding also cannot repair an active leak or a failed seal.
A soft pedal, abnormal travel, or incomplete disengagement can be consistent with air in the circuit, but none proves that air is the only fault. Leaks, internal cylinder bypass, installation errors, pedal-linkage problems, release-system defects, and clutch faults can produce similar symptoms.
Tools, Fluid, and Safety Setup
Gather the equipment before opening the bleeder. Pausing to find fluid or a wrench increases the chance of uncovering the reservoir feed or leaving the system exposed.
Checklist
- Fresh hydraulic fluid of the exact specified type
- Correctly sized box-end or suitable flare-compatible wrench
- Clear tubing that fits snugly over the bleed nipple
- Stable catch bottle or container
- Fluid-resistant gloves
- Eye protection
- Absorbent towels or pads
- Wheel chocks
- Suitable jack stands if under-vehicle access is necessary
- A vehicle-compatible jack or lift
- A helper, secure pedal brace, or approved bleeding tool
- A light for inspecting the cylinder, line, and fittings
Use fresh fluid from a clean container. Wipe dirt away from the reservoir cap before opening it, keep tools and hose ends clean, and prevent dirt, lint, old fluid, and other contaminants from entering the reservoir. Use the fluid specified by the vehicle manufacturer or reservoir marking (wikiHow’s professionally reviewed slave-cylinder guide).
Raise and support the vehicle correctly
If access requires lifting, work on a firm surface, chock the wheels, and use only the vehicle’s designated lifting points. Support the vehicle with correctly positioned stands before going underneath it; never rely on a jack alone. General professionally reviewed guidance likewise calls for approved lifting points and jack-stand support.
Do not automatically lift only the front. Vehicle-position requirements vary, and line routing can affect where air collects. Follow the application-specific procedure.
Protect yourself and the vehicle
Hydraulic brake fluid used in many clutch systems may irritate skin and eyes. Wear gloves and eye protection. It can also damage painted finishes, so cover nearby paint, contain the discharge, and clean spills promptly according to the fluid manufacturer’s instructions (wikiHow’s safety guidance).
Keep it contained and follow the fluid label’s handling instructions; check the applicable local disposal requirements rather than pouring it onto the ground or into a drain.
Connect the bleed hose
Place the wrench on the bleed screw, then push the clear hose snugly over the nipple. Route the other end into a stable container where it cannot whip free or overturn. The hose contains the discharge and makes bubbles easier to observe.
Open the bleeder only enough to establish flow. Obtain the opening guidance and final tightening torque from vehicle-specific information. When finished, seat the screw securely without overtightening it; general bleeding guidance also cautions against excessive tightening.
The Standard Two-Person Bleeding Procedure
Start with the vehicle safely secured, the specified fluid in the reservoir, the bleeder closed, and the clear hose connected to the catch bottle.
Agree on short commands with your helper: “Down,” “holding,” “open,” “closed,” and “up.” The helper must keep the pedal fully depressed until told that the bleeder is closed.
The essential sequence
- Press the clutch pedal and hold it down.
- Open the slave-cylinder bleeder.
- Allow fluid and air to leave through the hose.
- Close the bleeder.
- Only then release or manually raise the pedal.
This order prevents the return stroke from drawing air backward through an open bleeder (Miata.net one-person bleeding guide).
Step-by-step procedure
-
Check the reservoir. Fill it to the level specified for the vehicle with the correct fresh fluid.
-
Confirm that the bleeder is closed. The first pedal movement should act on the hydraulic circuit, not an open outlet.
-
Have the helper depress the pedal slowly. Follow any prescribed preliminary pumping routine. Otherwise, use slow strokes rather than rapidly agitating the fluid.
-
Hold the pedal down. The helper must not release it while the bleeder is open.
-
Open the bleeder slightly. Fluid and air should pass through the clear tube. The pedal may sink farther as pressure is released.
-
Close the bleeder with the pedal still down. Seat it sufficiently to prevent air entry, but do not repeatedly apply final-torque force during each cycle.
-
Release the pedal slowly. If it remains on the floor, raise it manually—but only after the bleeder is closed. This can occur during bleeding, although it does not prove the finished system is healthy.
-
Inspect and refill the reservoir. Refill before the level approaches the clutch-feed port. On a shared reservoir, fluid visible below that port is not enough.
-
Repeat slowly. Watch for bubbles and changes in flow. Check the reservoir after every cycle or every few cycles, depending on how quickly its level falls.
There is no universal stroke count. A routine fluid exchange, replacement cylinder, and completely dry circuit may require very different amounts of fluid and time. Stop using pedal cycles as the only measure of progress.
How to decide when bleeding is complete
Treat the job as provisionally complete only when all of these are true:
- Several consecutive cycles show no bubbles
- Pedal firmness improves and remains consistent
- Pedal travel and return are normal for the vehicle
- The clutch disengages normally
- The reservoir level remains stable
- No leaks appear at the master cylinder, line, hose, fittings, or slave
Bubble-free discharge alone is insufficient. If the pedal is firm but the clutch still drags or does not disengage, investigate pushrod seating and travel, slave installation, adjustment where applicable, the fork or release mechanism, and the clutch itself.
Priming a New Slave Cylinder or Completely Dry System
First determine whether the replacement master or slave must be bench bled or primed according to the application-specific procedure.
Preliminary open-press-close-raise sequence
Do not use this routine unless it is compatible with the vehicle’s service information. Where permitted:
- Fill and maintain the reservoir.
- Connect the clear hose to the bleeder and catch bottle.
- Open the bleeder.
- Press the clutch pedal down and hold it.
- Close the bleeder.
- Manually raise the pedal.
- Recheck and refill the reservoir.
- Repeat until fluid reliably reaches the bleeder.
The downstroke moves air toward the outlet, while closing the bleeder before raising the pedal prevents the return stroke from drawing air through it. This preliminary approach has been documented for a fully drained application before changing to conventional final bleeding (Audizine dry-system priming procedure).
Once fluid flows consistently, switch to the standard press-and-hold sequence and continue until hydraulic operation is stable.
Gravity pre-bleeding
Use gravity bleeding only if the vehicle procedure permits it:
- Fill the reservoir with the specified fluid.
- Attach the hose and position the catch container.
- Open the bleeder enough to allow flow.
- Wait for fluid to reach the outlet and form a steady drip or stream.
- Monitor and replenish the reservoir.
- Close the bleeder.
- Finish with the approved conventional or pressure procedure.
Gravity bleeding can pre-fill some systems, but its effectiveness varies with cylinder design, line routing, restrictions, and slave orientation. Forum experiences are mixed, so gravity flow does not prove that all air has escaped (discussion of gravity and reverse bleeding).
Monitor a dry system closely because it may consume fluid quickly. If no fluid reaches the outlet, stop and check:
- Reservoir level and feed-port coverage
- A closed or obstructed bleed screw
- A blocked or kinked line or hose
- Incorrect component installation
- A disconnected or restricted reservoir feed
- A misassembled master cylinder
- A required application-specific priming routine
Do not keep pumping indefinitely without flow.
How to Bleed the Clutch Without a Helper
A one-person method must be compatible with the vehicle.
Pedal-brace method
Use a rigid, stable brace that holds the pedal down without slipping or damaging the seat, trim, switches, or pedal assembly.
- Fill the reservoir and connect the bleed hose.
- Depress the clutch pedal slowly.
- Brace it securely in the down position.
- Open the bleeder and let fluid and air escape.
- Close the bleeder.
- Check and refill the reservoir.
- Hold the pedal while removing the brace.
- Let the pedal rise slowly or raise it manually.
- Repeat until the completion criteria are met.
The bleeder must be closed before the brace is removed. A documented Miata procedure uses this sequence, although brace dimensions and access are specific to that vehicle (Miata.net pedal-brace method).
One-way bleeding hose
A purpose-built one-way hose or valve may permit slow pedal operation without a helper. Follow the tool instructions and ensure every connection is airtight.
A one-way valve does not eliminate reservoir monitoring. Pause frequently and keep the clutch-feed port covered.
Gravity bleeding
Gravity bleeding needs little equipment and may help pre-fill a dry circuit, but it can be slow or ineffective when fluid does not flow freely or air is trapped above the outlet. Use it only where permitted, close the bleeder after steady flow develops, and complete the approved finishing procedure.
Pressure bleeding
Do not pressure bleed unless the exact vehicle procedure permits it and specifies a pressure limit. At a high level, the process is:
- Install the correct sealed reservoir adapter.
- Configure the pressure bleeder according to its instructions.
- Apply only the vehicle-approved pressure.
- Connect a clear hose at the slave.
- Open the bleeder and observe the discharge.
- Close the bleeder when bubbles stop.
- Safely release equipment pressure according to the tool instructions before removing the adapter.
- Restore the reservoir level and verify operation.
A commercial overview gives a figure of approximately 12 PSI, but that generic number does not establish a safe pressure for every vehicle, reservoir, or adapter (Partdeal pressure-bleeding overview). Use the application-specific limit instead.
Vacuum bleeding
A vacuum bleeder draws fluid through the system from the slave end.
Use vacuum equipment only where permitted and according to its instructions. Judge success by stable pedal feel, clutch disengagement, fluid level, and leak inspection—not solely by bubbles visible in the vacuum hose.
Choosing a one-person method
| Method | Helper needed | Equipment | Main advantage | Main limitation | Major risk |
|---|---|---|---|---|---|
| Pedal brace | No | Secure brace, hose, bottle | Closely reproduces manual bleeding | Requires movement between pedal and bleeder | Releasing the brace before closing the bleeder |
| One-way hose | No | Purpose-built valve hose | Allows operation from the cabin | Depends on airtight fittings and valve function | Air entry or misleading bubbles |
| Gravity | No | Hose and bottle | Simple and may pre-fill a dry circuit | Slow or ineffective on some layouts | Reservoir running low |
| Pressure | No | Bleeder and sealed adapter | Provides steady flow | Requires an approved adapter and pressure | Reservoir damage, leakage, or fluid spray |
| Vacuum | No | Vacuum bleeder | Draws fluid from the slave end | Can struggle with high air pockets | False bubbles around bleeder threads |
| Reverse bleed | No | Compatible transfer equipment | Moves air upward toward the reservoir | Highly application-dependent | Overflow, contamination, or fitting damage |
Choose the least complex method authorized for the vehicle. Conventional pedal bleeding remains the baseline because its sequence and result are straightforward to verify.
When Air Remains Trapped in the Slave Cylinder
Air can remain at a high point in the slave body or hydraulic line when that pocket does not intersect the normal bleed path. Clear discharge can therefore coexist with residual air.
Bleeder orientation is a diagnostic clue, not a universal installation rule. Reports describe repositioning some external slaves so the bleeder becomes the highest point, but results are mixed and factory layouts differ (Austin-Healey Experience discussion).
Before moving an external slave
Do not move or unbolt a slave unless service information for the exact application authorizes it and identifies:
- That the slave is external
- The approved bleed orientation
- Whether it may be moved without opening the hydraulic connection
- How to restrain the piston and pushrod
- How the pushrod engages the fork or release arm
- The mounting-bolt torque and installation checks
An unrestrained external slave can overextend. Do not operate the clutch pedal with the slave hanging free; the piston or pushrod may be ejected or damaged. Vehicle-specific installation guidance warns that forcing the pedal when the pushrod is not correctly engaged can eject those parts.
Never apply this technique to an internal concentric slave. Do not swap inlet and bleeder ports merely because the bleeder appears low; matching threads do not prove that the ports are functionally interchangeable.
Application-specific piston-compression method
Do not perform this sequence unless the exact service procedure permits manual movement of the accessible external slave piston.
For a compatible application:
- Bleed conventionally as well as possible.
- Have the helper depress and hold the clutch pedal.
- Open the bleeder.
- Carefully move the accessible slave piston backward through the approved pushrod movement.
- Hold it in position and close the bleeder.
- Only then allow the pedal to return slowly.
- Recheck the reservoir and repeat only if the application procedure calls for it.
Moss Motors presents this technique as a remedy for a small pocket remaining in some accessible slave cylinders after conventional bleeding (Moss Motors trapped-air procedure). It is unsuitable for inaccessible internal slaves and may be wrong for external designs whose pistons cannot be safely manipulated.
If vigorous pumping has made the fluid foamy, pause before another attempt.
Reverse Bleeding and Other Escalation Methods
Reverse bleeding introduces clean, compatible fluid at the slave bleed port and moves it upward toward the master cylinder and reservoir. It may help with a suspected high air pocket, but it is an application-specific escalation—not the default method.
Do not perform the following sequence unless the exact vehicle’s service information accepts reverse bleeding and you have:
- The specified fresh fluid
- Clean, fluid-compatible transfer equipment
- A correctly sealing fitting or hose
- A clean way to remove excess reservoir fluid
- Protection for surrounding paint
- Instructions addressing any shared-reservoir complications
Do not improvise with a fitting that may leak, damage threads, or introduce contamination.
General reverse-bleeding sequence
Where specifically authorized:
- Clean around the reservoir and slave bleed point.
- Remove enough reservoir fluid to create space for the returning volume.
- Fill and purge the transfer tool so it does not inject air.
- Connect it securely at the slave bleed port.
- Move fluid slowly toward the master cylinder.
- Watch the reservoir continuously and remove excess before it overflows.
- Stop if dirty fluid moves upstream or resistance becomes abnormal.
- Disconnect and restore the bleed screw or fitting as specified.
- Perform a short conventional forward bleed if the procedure permits it.
- Restore the reservoir level and verify operation.
Specialist forum reports recommend a brief forward bleed afterward because reverse bleeding may leave air near the slave, but this is anecdotal and vehicle-specific (XWeb reverse-bleeding discussion). It does not support a universal syringe size, adapter, fitting thread, or pressure.
Do not use it to push contaminated fluid upstream. Stop rather than improvise if:
- The vehicle has an internal slave without an authorized reverse procedure
- The bleeder arrangement is unusual
- Manufacturer information identifies shared-reservoir complications
- You cannot make a clean, sealed connection
- The fluid is contaminated
- Reverse flow meets unexplained resistance
Loosening hydraulic line fittings is not a general substitute for a proper bleeding procedure.
Diagnose the Result Instead of Bleeding Indefinitely
Use the observed failure pattern to determine the next check.
No fluid reaches the bleeder
Check:
- Reservoir level and clutch-feed-port coverage
- Reservoir outlet or feed-hose restriction
- Bleed-screw obstruction
- A blocked, pinched, or incorrectly routed line
- Incorrect master- or slave-cylinder installation
- Whether the dry circuit requires special priming
- Whether a replacement component required bench bleeding
Remove the bleed screw for inspection only if the service procedure permits it and fluid loss and contamination can be controlled.
Bubbles continue or repeatedly return
Persistent bubbles may indicate a trapped pocket or a route through which air enters. Inspect:
- Reservoir connection and feed hose
- Master cylinder
- Hard line
- Flexible hose
- Unions and fittings
- Slave connection and body
- Slave dust-boot area
- Bleed screw and seat
Look for wetness, staining, fluid trails, loose connections, damaged hoses, and a falling reservoir level. During vacuum bleeding, bubbles may also be drawn around the bleeder threads, so compare the hose display with pedal behavior and leak findings.
Repeated bleeding cannot repair a failed seal or leaking hose. In one owner report, a pedal-to-floor problem was ultimately traced to a leaking hydraulic hose rather than residual air (Subaru Forester owners’ discussion).
Pedal remains on the floor
During bleeding, the pedal may need to be raised manually after the bleeder is closed. If it still fails to return after bubble-free bleeding, investigate:
- External leakage
- Loss of hydraulic pressure
- Internal master- or slave-cylinder bypass
- Pedal return spring or linkage
- Pedal-to-master-cylinder connection
- Binding or misadjustment
- Incorrect slave pushrod seating
- Release-system binding
Do not assume a permanently non-returning pedal is normal.
Pedal firms up, then quickly becomes soft again
A short-lived improvement suggests more than a one-time air pocket. Possibilities include:
- A leaking flexible hose
- A loose or leaking fitting
- A faulty master cylinder
- A faulty slave cylinder
- Another connection admitting air
- Incorrect installation
Inspect the system before repeating the bleeding process.
Pedal is firm, but the clutch will not disengage
Shift the diagnosis toward:
- Slave pushrod seating
- Actual slave or release-arm travel
- Correct cylinder installation
- Pedal or pushrod adjustment, where provided
- Clutch fork position and condition
- Release bearing or concentric release mechanism
- Clutch-disc orientation
- Pressure-plate or clutch assembly faults
- Mechanical binding
A firm pedal and clear fluid do not prove that the installation is correct.
Stop immediately if you find
- Uncontrolled fluid leakage
- A broken or severely damaged bleeder
- A pushrod that is not seated
- Inability to build or maintain hydraulic pressure
- Contaminated fluid
- An unexpectedly hard pedal after component installation
- A piston or pushrod beginning to overextend
- Uncertainty about an internal slave procedure
A hard stop after slave installation can indicate incorrect pushrod engagement. Do not force the pedal because doing so may eject or damage the piston or pushrod.
Post-bleed checks
- Tighten the bleeder to the specified torque without overtightening it.
- Remove the hose and clean residual fluid.
- Restore the reservoir to the specified level and install its cap.
- Inspect the reservoir, master cylinder, complete line, flexible hose, fittings, and slave for leakage.
- Operate the pedal repeatedly and verify consistent feel and return.
- Verify clutch disengagement using the stationary check specified for the vehicle.
- Remove all tools and containers, lower the vehicle correctly, and ensure no person or obstruction is near its path.
- Only after normal pedal return, no leakage, and successful stationary verification should you perform a cautious low-speed check in a safe area.
- After waiting, recheck the reservoir and inspect for leakage.
Do not improvise a powered stationary test while the vehicle is raised. If the service information does not define a safe verification procedure, have the repair checked professionally before driving.
Frequently Asked Questions
Why must I close the clutch bleeder before releasing the pedal?
The returning master cylinder must draw replacement fluid from the reservoir. If the slave bleeder is open, the system can instead draw air backward through that outlet. Close the bleeder first, then release or manually raise the pedal.
Is it normal for the clutch pedal to stay on the floor while bleeding?
It can happen while pressure is released during bleeding, and some pedals need to be raised manually. Close the bleeder before lifting the pedal. If it continues after bleeding, inspect for leaks, pressure loss, linkage problems, binding, and cylinder faults.
Can I gravity bleed a clutch slave cylinder?
Sometimes, if the vehicle procedure permits it. Gravity flow may pre-fill certain systems but can be slow or ineffective on others and may not clear a high air pocket. Finish with the approved conventional or pressure procedure and verify actual clutch operation.
Why is the clutch pedal still soft after no more bubbles appear?
Air may remain at a high point outside the visible discharge path. Other causes include a leaking hose or fitting, internal cylinder bypass, incorrect pushrod seating, or misleading bubbles during vacuum bleeding. Diagnose the hydraulic circuit if softness persists or quickly returns.
Should the slave-cylinder bleeder always point upward?
No. A high bleeder can help air escape, but factory designs differ. Reposition an external slave only when the exact vehicle procedure permits it and explains how to restrain the piston and pushrod. Never rotate an internal concentric slave or swap ports merely to make the bleeder point upward.
The key sequence is press and hold, open, close, then release. Keeping the reservoir above the clutch-feed port is equally important. Successful bleeding produces stable pedal feel, reliable disengagement, a steady fluid level, and no leaks. If those results do not hold, stop repeating the procedure and diagnose trapped air, leakage, component failure, or mechanical installation problems using the vehicle’s service information.